Pay in installments of $7.33 with
![]() ,
,
![]() and
and
![]()
Shipping Estimate
USA
- USA
- CAN
- USA
- CAN
Ships within 48 hours · Estimated delivery Jul 1 - Jul 6
For Your Every Summer RSVP, with Code: SUMMER15
Description
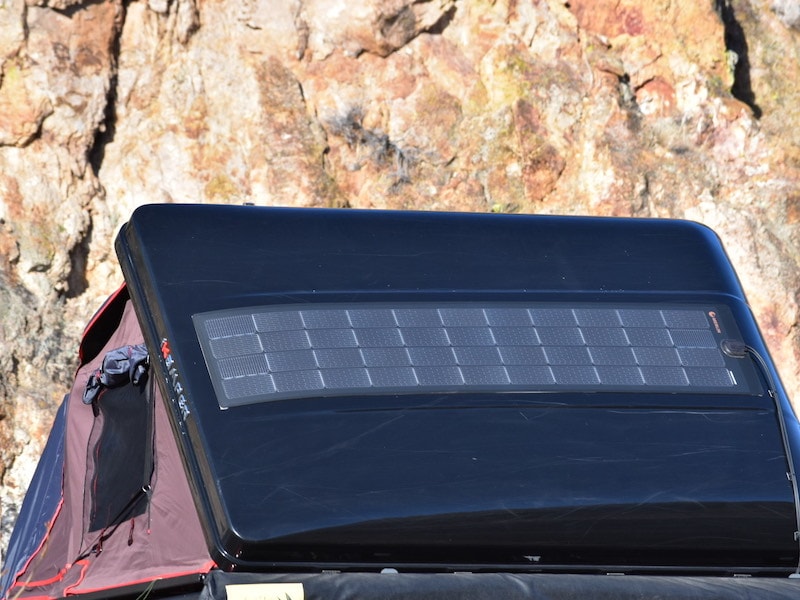
solar roof tent RHINO ADVENTURE GEAR SolarHawk Roof Top Tent Solar Panel for iKamper Skycamp 3.0 & 4.0 (Powered by MERLIN)Back in stock! Compatible with the new 4. 0 iKamper Skycamp! Units are now 110watts! The one, the only The SolarHawk is a 110W Solar Panel designed and manufactured to precisely fit the central raised 'mohawk' that runs the length of the iKamper Skycamp 4X 3. 0 and 4. 0 Roof Top Tent. Whether it's powering a fridge freezer, keeping 12V starter batteries topped off or enabling use of power hungry vehicle accessories, the SolarHawk can convert your
Back in stock!
Compatible with the new 4.0 iKamper Skycamp! Units are now 110watts!
The one, the only... The SolarHawk is a 110W Solar Panel designed and manufactured to precisely fit the central raised 'mohawk' that runs the length of the iKamper Skycamp 4X 3.0 and 4.0 Roof Top Tent. Whether it's powering a fridge/freezer, keeping 12V starter batteries topped off or enabling use of power-hungry vehicle accessories, the SolarHawk can convert your iKamper roof top tent into a massive portable solar panel that goes where you go. Go further and stay off-grid longer by packing your own power!
The SolarHawk is permanently mounted flush to the outer shell of the iKamper Skycamp 4X via an unbelievably strong 3M adhesive backing. It's always deployed, soaking up the rays on top of your rig with zero effort on your part. Best of all, we've used the most rugged panels on the market, ready for the abuse associated with prolonged off-road use.
We did our homework when designing the SolarHawk. In addition to making an edgy and bold stylistic statement by giving the iKamper a mohawk, we've gone to the ends of the earth to find the most robustly constructed flexible panels available. (Spoiler Alert: The best portable solar panels for overlanding were found in our own backyard! At Merlin Solar in San Jose, CA. We've toured the factory and met the skilled scientists and technicians driving their awesome R&D program). Because we use these panels ourselves, we decided to pre-wire the SolarHawk with the preferred grey Anderson SB50 connectors to provide maximum compatibility with commonly used overland accessories and solar charge controllers.
SolarHawk Roof Top Tent Solar Panel for iKamper Skycamp Key Features
-
Constructed with off-road-ready materials: fully sealed, low profile junction box is impenetrable to dirt and water; adhesive backing dampens transfer of vibrations to solar array; busbar-free PV cells with redundant connectivity to withstand physical and thermal extremes.
-
Angular positioning complements iKamper usage: Morning and afternoon solar incidence angle for panels is improved when iKamper is opened (angle vehicle so Skycamp 4X shell is pointed toward sun when roof top tent is open). Panel positioning on closed tent is ideal for overhead, mid-day sun. This often corresponds to times when tent is closed for transit or parked.
-
Better battery performance: It's no secret that battery longevity depends on the charge profile usage habits of the electrical system. Keep your 12V battery in peak condition by maintaining healthy charging habits and not overdrawing your aux battery.
- Built-in convenience: No need to remember to pack it, plug it in, or set it up; the SolarHawk is always up on the iKamper, working hard to convert photons into colder beverages or brighter nights.
- Portable & practical: 110W panel is sufficient to power most fridge/freezers indefinitely, allowing you to adventure further and longer without worrying about running down your battery.
- Designed by iKamper experts: Rhino Adventure Gear was the very first distributor to offer iKampers for sale other than their Kickstarter campaign. To date we have installed hundreds of Skycamps and have an intimate understanding of their construction and ample first-hand experience living out of the iKampers on our vehicles and trailers. Detail-oriented early adopters often come up with the best mods, and we conducted extensive product testing to ensure the SolarHawk is exactly what serious off-grid campers need to level up their off road game and unlock bigger adventures.
- Warranty is indicative of high-quality: Material & Workmanship- 5 years. Power output- 25 years with 90% of nominal rated output for years 1-10 and 80% of nominal rated output for years 11- 25.
SolarHawk 110W RTT Solar Panel- Technical Specifications
Architecture of Photovoltaic Cells arrayed into SolarHawk panels
- 110 Watt, 23.5% efficient, monocrystalline array yielding a significantly higher power density than a thin-film panel.
- Merlin's monocrystalline cells are highly efficient and not prone to moisture sensitivity
- Merlin's patented grid technology dwarfs conventional connectivity levels afforded by older solar tech with busbars and also provides a robust & durable foundation analogous to rebar in cement.
- Redundancy of connectivity improves panel durability and resistance to thermomechanical stress (aka overlanding adventures).
- Elimination of failure-prone aluminum busbars results in a more robust and longer-lasting solar panel compared to the more widely available portable solar panels distributed by big-box outdoor stores and Amazon.
SolarHawk Battery & Charge Controller Compatibility
- Compatible with 12V batteries including lithium batteries, lead acid batteries, and AGM batteries.
- An MPPT charge controller is required. This means that portable battery units with built-in non-MPPT charge controllers will not work with the SolarHawk (this includes the Dometic PLB40).
- The GoalZero Yeti Portable Power Stations may not be compatible with the SolarHawk. Please check the VOC input rating of your charge controller for compatibility
SolarHawk Wiring Specifications
- Array terminates in fully-sealed, low-profile (18mm high) junction box.
- 36" 12 AWG insulated wiring runs from the junction box to an Anderson connector.
- Grey SB50 Anderson connector is included for convenient routing of power to 12V accessories/batteries and charge controllers.
SolarHawk Adhesive Backing Materials
- Backing 3M VHB & 9775 adhesive backing
- Note: If you had a bad experience with Command Strips and are worried about this adhesive coming off, please avoid commercial airlines- the wingflaps of passenger jets that undergo multiple rounds of temperature fluctuations from -65F to 150F on a daily basis are held on with 3M VHB tape. According to 3M, removal of VHB requires solvents and an oscillating power tool to cut through the bond. It is insanely sticky and resistant to mechanical vibrations and temperature fluctuations.
- SolarHawk adhesion to both the shiny Skycamp shells and the Rocky Black / Line-X shells was verified during our pre-release testing.
How to Install a SolarHawk panel on your iKamper Skycamp 4X Roof Top Tent
- We suggest anchoring the SB50 connector near the rear hinge of your iKamper Skycamp 4X to avoid interference with Roof Top Tent opening and closing mechanisms. Connect to complementary gray SB50 Anderson connector of charge controller or battery set up as desired. Optimize wire connectivity before adhering panel to tent.
- Clean iKamper shell with soap and water, then with alcohol (ideally isopropanol) before application. Lay Solar Hawk module onto Skycamp 4X, get into position centering it front to back and side to side (there are a few inches of play front to back to fit). When in the proper position on the tent, peel the front VHB tape and stick the front of the panel down to the tent. You will then unpeel and stick the remaining adhesive from the front to the back. When the entire panel is down and stuck, apply pressure around the entire rim of the panel with your hands, 30 seconds or so at a time. Make sure there are no air gaps between the panel and tent.
PLEASE NOTE: It is your responsibility to ensure you fully understand how solar panels will integrate with your 12V system (starter battery, aux battery, charge controller, powered appliances etc). There are nearly infinite set up options possible, certainly more than we can describe here. There are excellent educational resources about 12V systems and solar panels available online. Additional items such as a REDARC DC-DC converter, lithium aux battery, solar charge converter, or wiring connectors may be needed depending on how your setup is configured and how you intend to use it. The SolarHawk solar panel is not designed to have a phone, light, or fridge plugged directly into the panel output cable; rather it works as part of a 12V battery system.
If you currently only have the battery that came with your vehicle and you are looking to install solar for camping, please reach out and we can discuss a more inclusive 12V system package tailored to your needs.
As with all Rhino Adventure Gear products, we offer installation at either of our two California shops- located in San Marcos, San Diego & Fremont, San Francisco.
Shipping Notes
- Free Standard Shipping on $100+ Orders to the USA.
- Except Preorder products are shipped in 48 hours.
- Delivery to the USA:
- Standard Shipping : 3-10 business days
- If time is of the essence, please consider selecting expedited delivery for faster service.
Exchange/Return Notes
- We offer a 30-day return/exchange service after receiving.
- Final sale items are not eligible for returns or exchanges.
- To process your return/exchange, please contact us at [email protected]
- Please click here for more details>>> Return & Exchange Policy